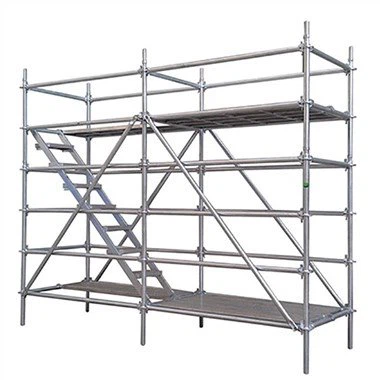
As a supplier of Ringlock Scaffolding, I often receive inquiries about the proper installation of hoists on Ringlock Scaffolding. This process is crucial for ensuring the efficiency and safety of construction projects. In this blog post, I'll guide you through the steps of installing hoists on Ringlock Scaffolding, providing you with the necessary knowledge to carry out this task effectively.


Understanding Ringlock Scaffolding
Before delving into the hoist installation process, it's essential to have a basic understanding of Ringlock Scaffolding. Ringlock Scaffolding is a modular system known for its high load - bearing capacity, flexibility, and ease of assembly. It consists of vertical standards with ring nodes at regular intervals, horizontal ledgers, and diagonal braces. The ring nodes allow for quick and secure connection of various components, making it a popular choice in the construction industry. You can learn more about the Ringlock Scaffolding System on our website.
Selecting the Right Hoist
The first step in installing a hoist on Ringlock Scaffolding is to select the appropriate hoist for your project. Consider factors such as the weight of the materials to be lifted, the height of the lift, and the frequency of use. Electric hoists are commonly used for their efficiency and ease of operation, while manual hoists can be a cost - effective option for lighter loads and less frequent use.
Pre - installation Checks
- Scaffolding Inspection:
- Before installing the hoist, thoroughly inspect the Ringlock Scaffolding. Check for any damaged or missing components, such as Ringlock Standards. Ensure that all connections are tight and secure. The scaffolding should be erected according to the manufacturer's specifications and local safety regulations.
- Verify the load - bearing capacity of the scaffolding. The hoist and the materials it will lift should not exceed the rated capacity of the scaffolding structure.
- Hoist Inspection:
- Examine the hoist for any visible damage, such as cracks in the housing, worn cables, or malfunctioning controls.
- Check the hoist's safety features, including the brake system, limit switches, and overload protection. Make sure these features are in proper working condition.
Installation Steps
Step 1: Mounting Bracket Installation
- Select the Mounting Location:
- Choose a suitable location on the Ringlock Scaffolding for the hoist mounting bracket. The location should be on a stable and well - supported section of the scaffolding. It should also provide clear access for loading and unloading materials.
- Ensure that the mounting location is at a height that allows for easy operation of the hoist controls and provides sufficient clearance for the lifted materials.
- Attach the Bracket:
- Use appropriate fasteners, such as bolts and nuts, to attach the mounting bracket to the Ringlock Scaffolding. Make sure the bracket is level and securely fastened. Double - check the tightness of the fasteners to prevent any movement during hoist operation.
Step 2: Hoist Installation
- Lift the Hoist:
- Use a temporary lifting device, such as a small crane or a block and tackle, to lift the hoist into position on the mounting bracket. Ensure that the hoist is centered on the bracket and properly aligned.
- Secure the Hoist:
- Once the hoist is in position, use bolts or other appropriate fasteners to secure it to the mounting bracket. Follow the hoist manufacturer's instructions for the correct torque settings of the fasteners.
Step 3: Cable and Hook Installation
- Cable Installation:
- Thread the hoist cable through the pulley system of the hoist. Make sure the cable is properly seated in the pulleys and there are no kinks or twists.
- Check the cable tension. The cable should be taut but not overly tight, as this can cause premature wear on the cable and the hoist components.
- Hook Installation:
- Attach the lifting hook to the end of the cable. Ensure that the hook is properly secured and that its safety latch is functioning correctly. The hook should be able to rotate freely to accommodate different load orientations.
Step 4: Electrical Connection (if applicable)
- Power Supply:
- If you are using an electric hoist, connect it to a suitable power supply. Make sure the power supply meets the hoist's voltage and amperage requirements.
- Use a dedicated circuit breaker for the hoist to prevent overloading and electrical hazards.
- Wiring:
- Follow the hoist manufacturer's wiring diagram to connect the hoist to the power supply. Ensure that all electrical connections are properly insulated and protected from moisture and physical damage.
Post - installation Testing
- Function Test:
- Conduct a function test of the hoist before using it to lift any materials. Operate the hoist in both the up and down directions to ensure smooth operation. Check for any abnormal noises, vibrations, or malfunctions.
- Load Test:
- Perform a load test using a test load that is equal to or slightly greater than the maximum expected load. Lift the test load a short distance and hold it for a few minutes to check the hoist's stability and the integrity of the scaffolding structure.
- Observe the hoist's performance during the load test. If there are any signs of instability or excessive stress on the scaffolding, immediately stop the test and make the necessary adjustments.
Safety Precautions
- Operator Training:
- Only trained and qualified operators should be allowed to operate the hoist. Provide comprehensive training on the hoist's operation, safety features, and emergency procedures.
- Load Limitations:
- Never exceed the rated load capacity of the hoist or the scaffolding. Clearly mark the maximum load capacity on the hoist and the scaffolding for easy reference.
- Regular Maintenance:
- Establish a regular maintenance schedule for the hoist and the scaffolding. Inspect the hoist for wear and tear, lubricate moving parts, and replace any damaged components as needed.
- Conduct periodic inspections of the scaffolding to ensure its continued stability and safety.
Conclusion
Installing a hoist on Ringlock Scaffolding requires careful planning, proper selection of equipment, and strict adherence to safety procedures. By following the steps outlined in this blog post, you can ensure a safe and efficient installation. If you have any further questions or need assistance with your Ringlock Scaffolding or hoist installation, feel free to contact us. We are a leading supplier of Q235 Steel Ringlock Scaffolding System and can provide you with high - quality products and professional advice. Whether you are a small - scale contractor or a large construction company, we are here to support your project needs. Contact us today to discuss your requirements and explore how our products can enhance the efficiency and safety of your construction operations.
References
- Manufacturer's manuals for Ringlock Scaffolding and hoists.
- Local safety regulations and standards for scaffolding and hoist installation.